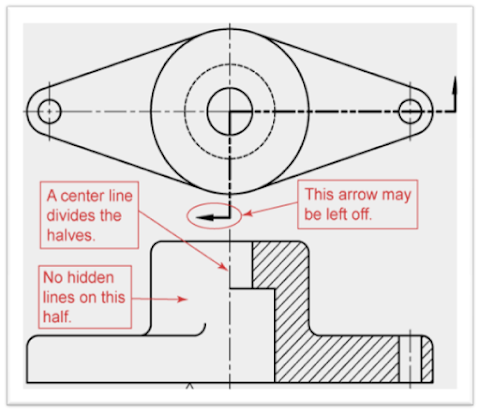
What is a Section view? Explain with examples :-
A section view is a view that is used in a drawing to
show an area or hidden part of an object by cutting away or removing some of
its parts or object. The cut line is known as “cutting plane”.
So while sketching an
object or part that requires a sectional
view, they are drawn by eye at an angle of 45 degrees approximately and they
are spaced about ( 1/8” ) apart. An example is shown as below ;
Different types of section view and their
examples :-
There
are different types of sectional views which
can be drawn. A few of them are explain below :-
Full sections:
This is the most common section which contains an imaginary laser cutting a single
line across an entire construction , offering a view of a portion of any
building with the rest of it put to a one side .
Half sections:
A half-section is a view of
an object which shows one-half of
the view in a section. In this view, we assumes the cutting plane to bend at a right
angle and we cut the object through only half , not the full length. And
cutting-plane line cuts halfway through the part and removes one quarter of an
object .
Broken sections:
A broken section is
a cut-away view of an
interior part. This view is
displayed inside a 2D boundary where we cut away an existing view of the part. A broken view
is helpful when we need a specific interior details of a certain part of the
object which need featuring .
Offset sections:
An offset
section is a section where we include several features in a
single section of an object
, also those which are not in a straight line. To do this, we bent the cutting
plane line, or “OFFSET” to pass
through the features of that part.
Assembly sections:
In this section,
the model is displayed as if cut by the planes and the faces that we specify,
so to show the internal construction of that model. We can select bodies or
components to include in or exclude from the section views.
Placement of section lining with example :-
While Section Lining , the section
lines are very light. While sketching an object or part that
requires a sectional view,
they are drawn by angle of approximately 45 degrees, and they are spaced about
1/8” apart. A few things that should be
kept in mind while sketching or drawing section lines :-
- Angle of 45 degree
in lines should be used.
- The lines should
never be parallel or perpendicular to an object lines.
- If the outline of
the object have 45 degree lines, then 30 or 60 degree lines should be
used.
Section Lining – Section lines placement :-
The full section view for given below diagrams:-
Answer
The half section view
for given below diagrams :-
Answer
The offset section view for given below diagrams :-
Answer
The broken-out section view for given below
diagrams :-
Answer


